Introduction
I'm currently working on creating an Android device tree for the Motorola Moto G50, which is essentially the build configuration for Android that lets you compile your own build of AOSP that you can successfully flash and run on your device. Even though Qualcomm and Motorola have done a lot of the work porting Android to the SOC & enabling device-specific features, you kind of have to go backwards from the finished ROM and say "how can I describe the hardware and software setup to AOSP?" so that it can create a build that contains the same components as your stock ROM. This process requires reading a lot of logs to figure out why your build isn't working and your device won't boot.
Typically, logs can be collected from an Android device using the Android Debug Bridge's logcat command to access the system's log buffers, but this isn't always accessible during device bringup. What if your USB connection isn't working? What if Android hasn't booted to the point where the logging daemon logd has even started yet? Luckily, in most cases the pstore driver is configured in the stock kernel to save kernel console & ring buffer contents to memory that won't be lost during a warm reboot, so kernel logs can often be found that way as well. But what that wasn't configured and we didn't have kernel source code, or what if we just want to see logs before the Linux kernel has even been loaded? That's where UART comes in.
What is UART?
UART is a simple hardware interface to implement serial communication protocols to transmit and recieve data, only using two signals, TX and RX. It's often found on embedded devices like cameras or routers, and they're often used for development, debugging, and even hardware hacking where you might just be able to access a root shell! Now, I'm definitely not expecting to see a root shell, and in fact I'd be very surprised if it even allows recieving of commands, given the strong security of modern Android devices, but I think it will be interesting nonetheless.
Choosing a phone for UART access
UART interfaces can come in many different forms - some devices repurpose the headphone jack (R.I.P Google Nexus), others use pins in the USB port (modern Pixels) or the SD card slot, and some simply expose them as test points on the PCB (foreshadowing). I didn't want to take apart my main phone for this, especially since I didn't know if the UART pins were even going to be accessible, so I decided to buy a phone just for this purpose. I wanted a phone from a development-friendly manufacturer, and didn't want to spend too much. That was when I came across Sony's Open Devices program. They support bootloader unlocking, publish kernel source code (it's GPL so it's kind of ridiculous that I have to list this as a pro), and even have AOSP devices trees up on their GitHub to compile stock Android for your device. This commitment to open-source by Sony is commendable. And, crucially, they even have a guide on accessing UART ports!
Unfortunately, it looks like Sony phones aren't really sold in Canada, and as I was looking for something older & cheaper, there weren't very many options. I eventually found the Xperia XA2 on Ebay for $90 CAD - it was released in 2018 with Android 8.0 and only runs Linux 4.4, but it's good enough for my purposes here.
Teardown
Let's check out Sony's guide and see where the UART pins are. Did we get lucky with a phone that has them on the SD card? Unfortunately not - we only get this image, which isn't very descriptive, and no shot of the board. Time for a teardown!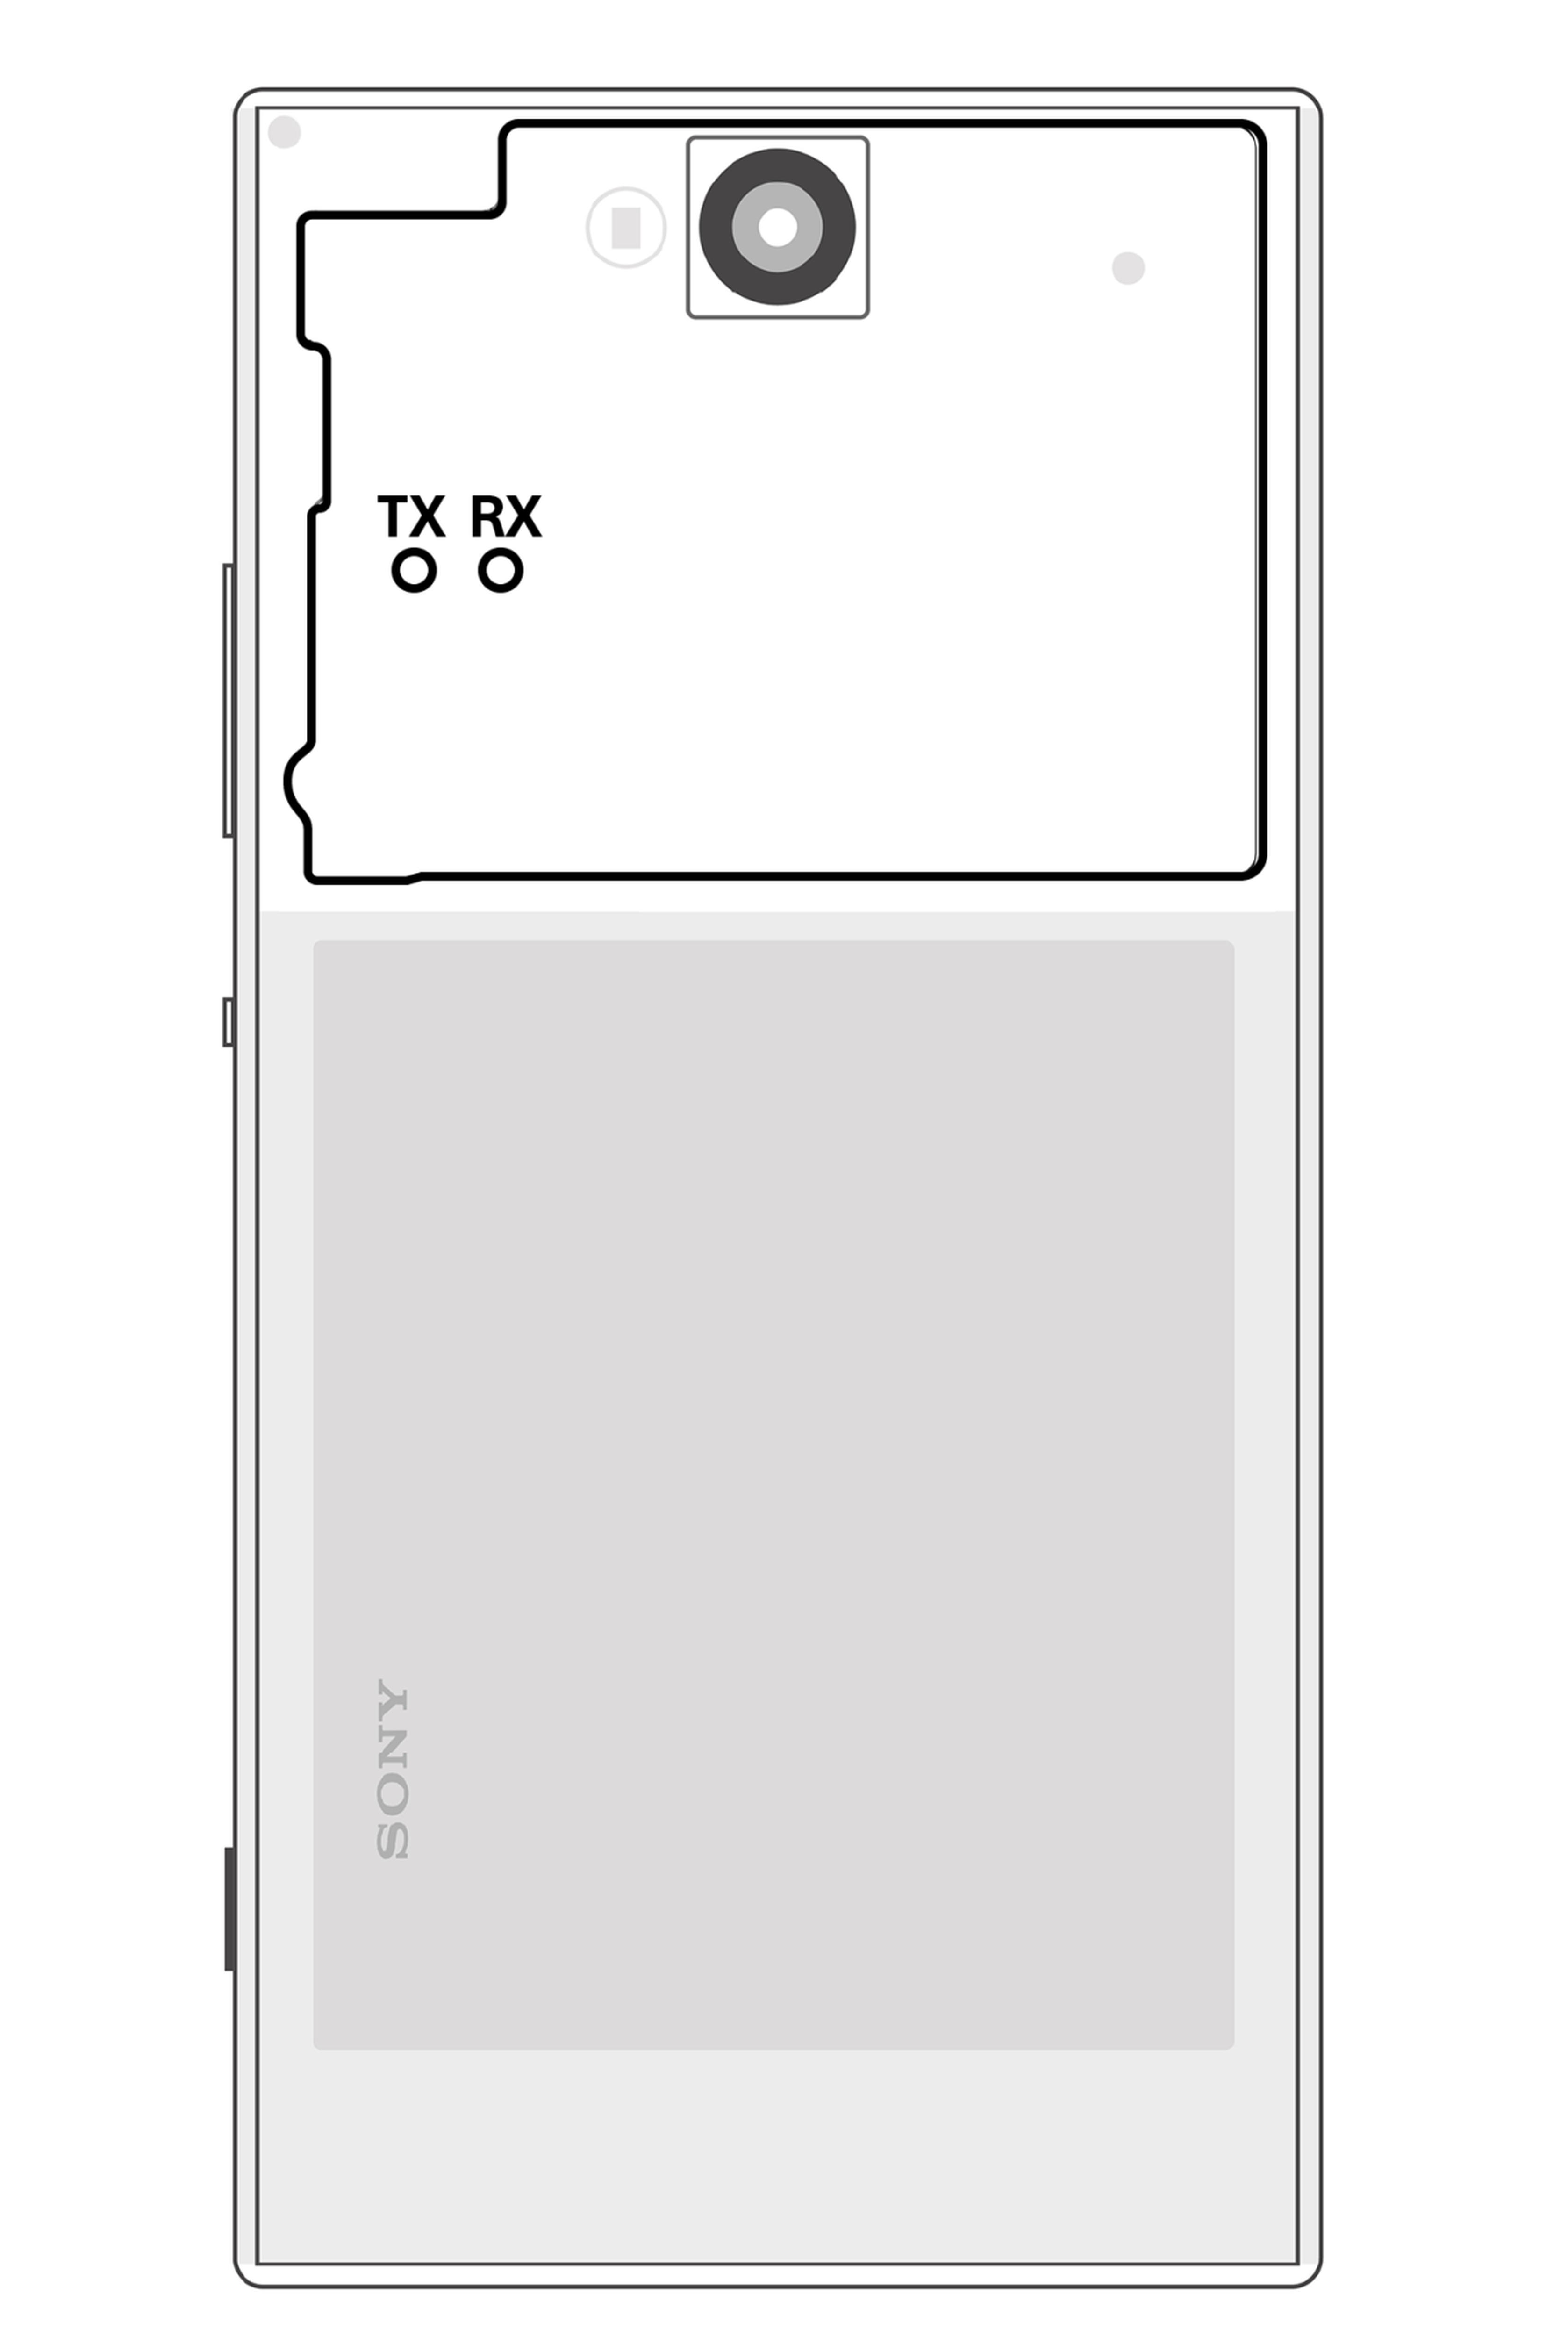
The back plastic cover comes off fairly easily with a heatgun, revealing the inside of the phone. Make sure not to pull to hard as the fingerprint sensor ribbon cable is still connected.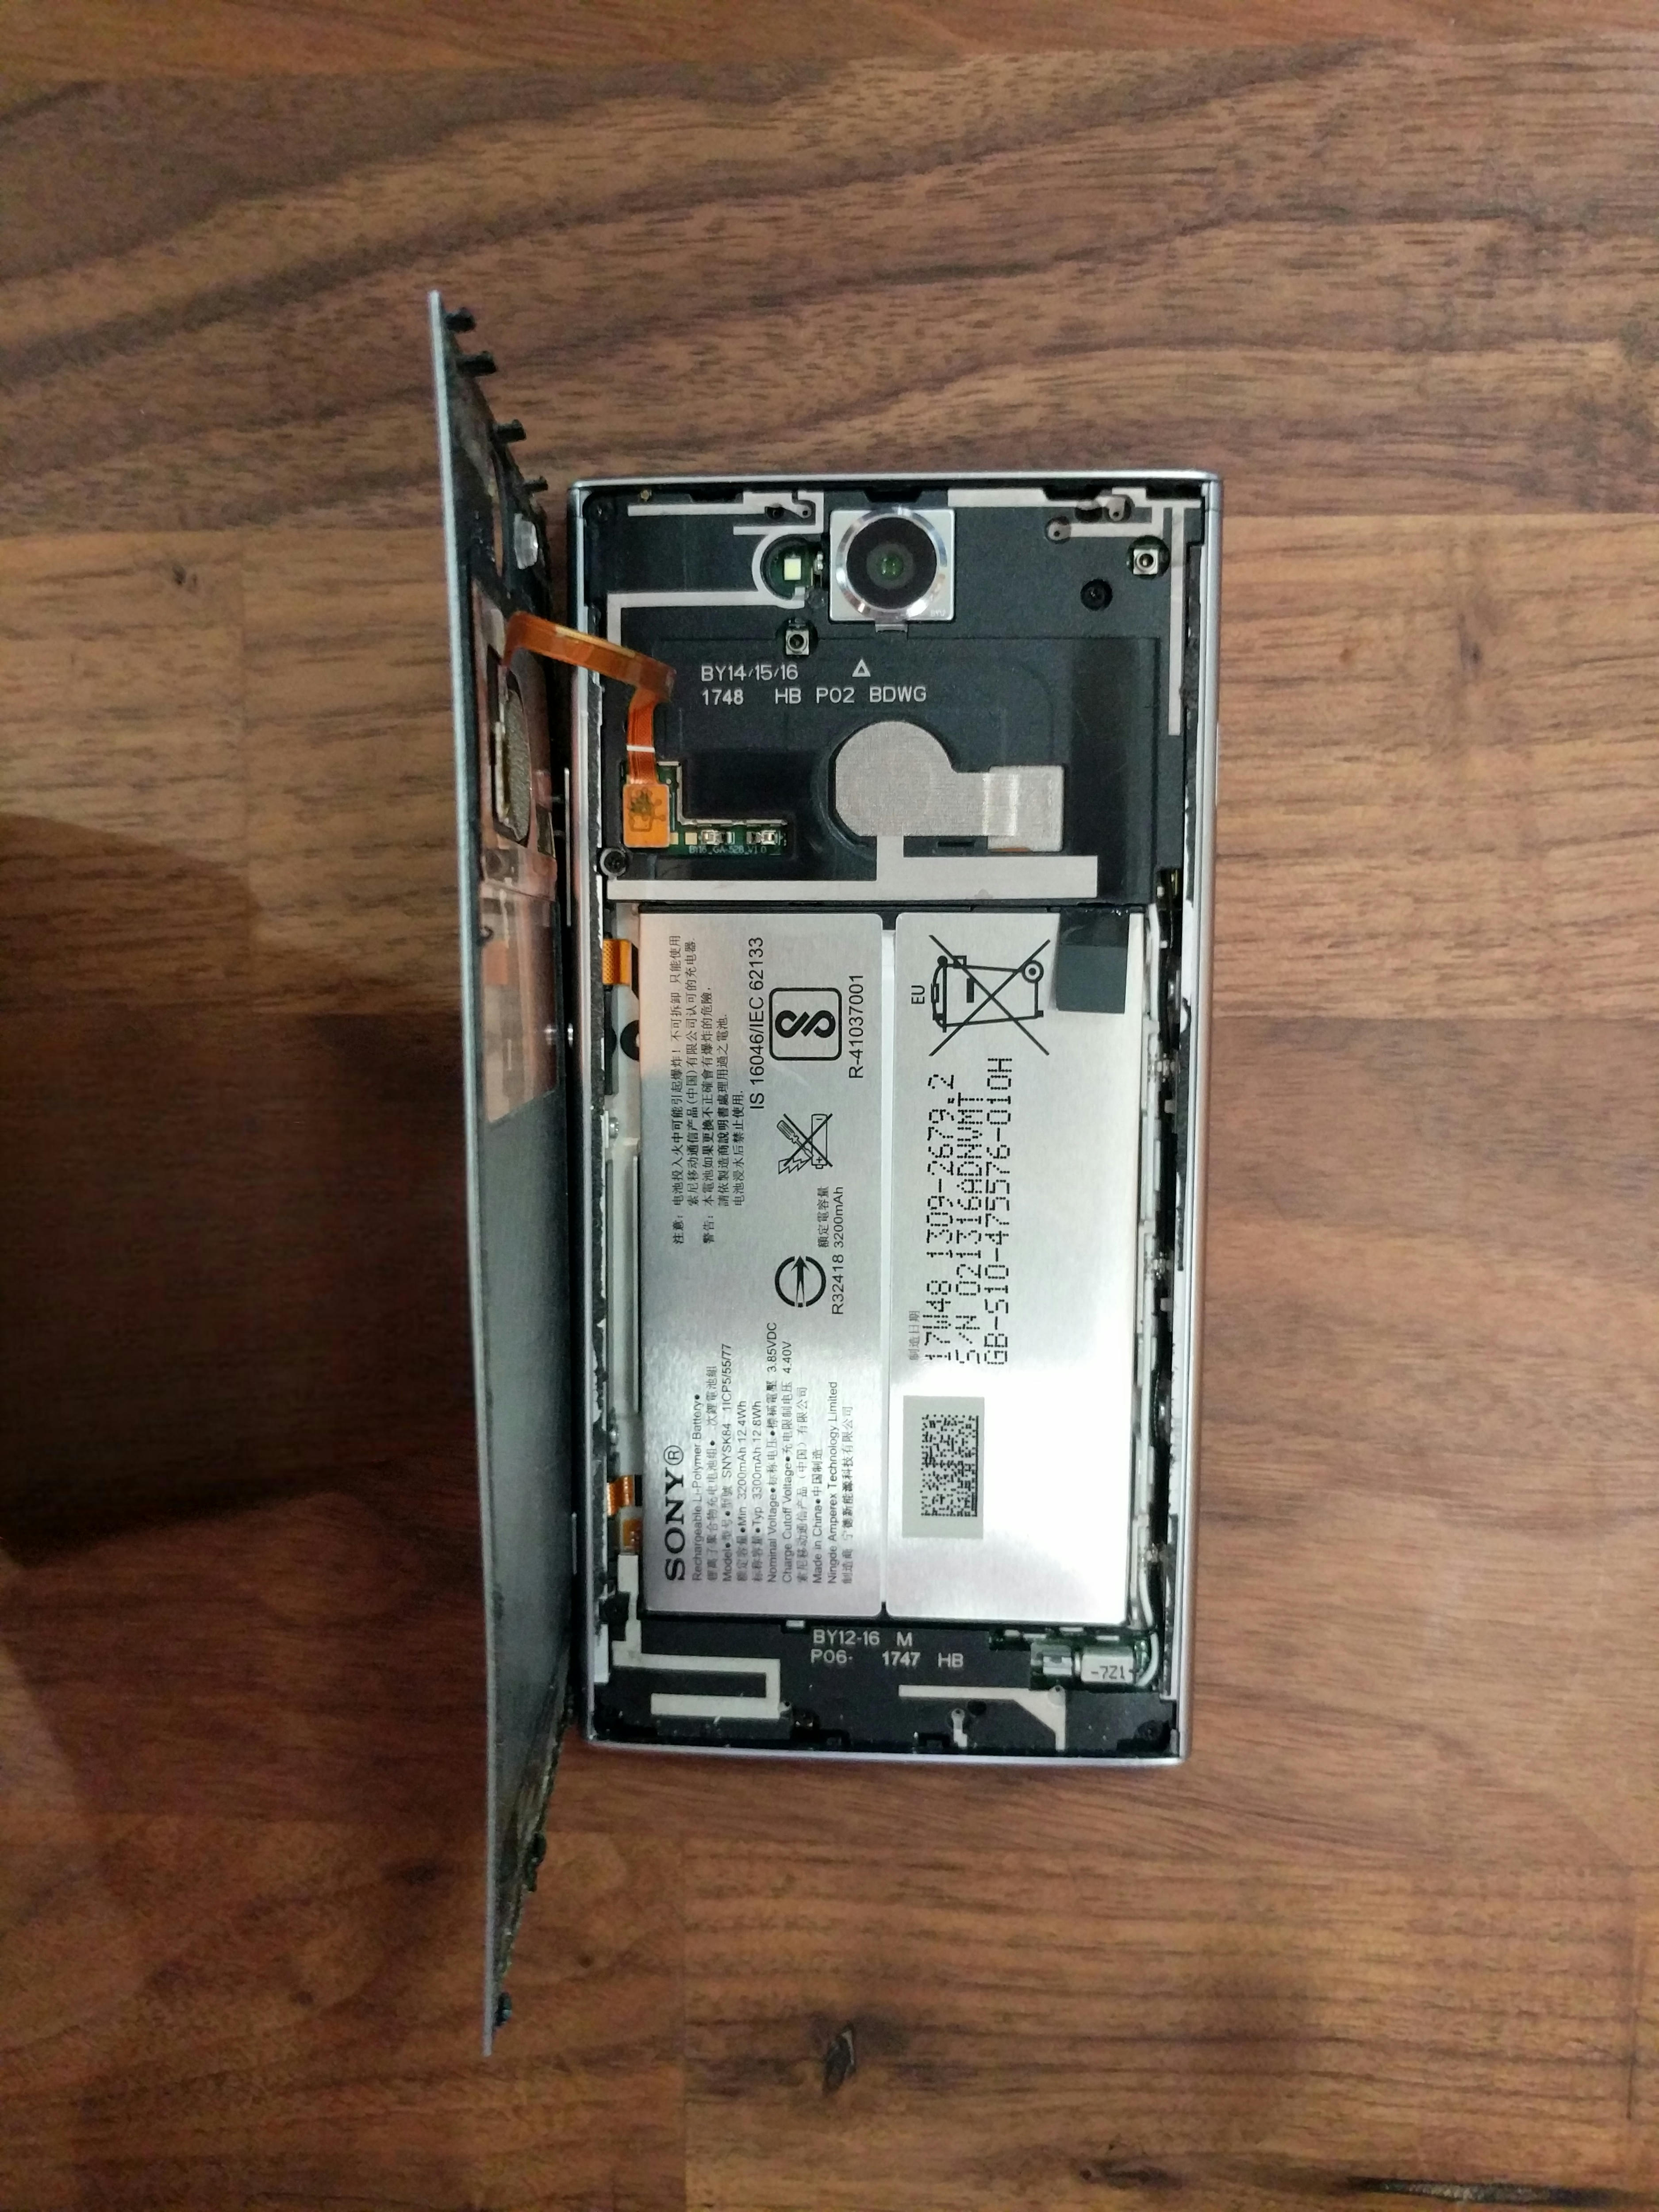
Next, there's just 3 screws to remove the plastic cover over the PCB: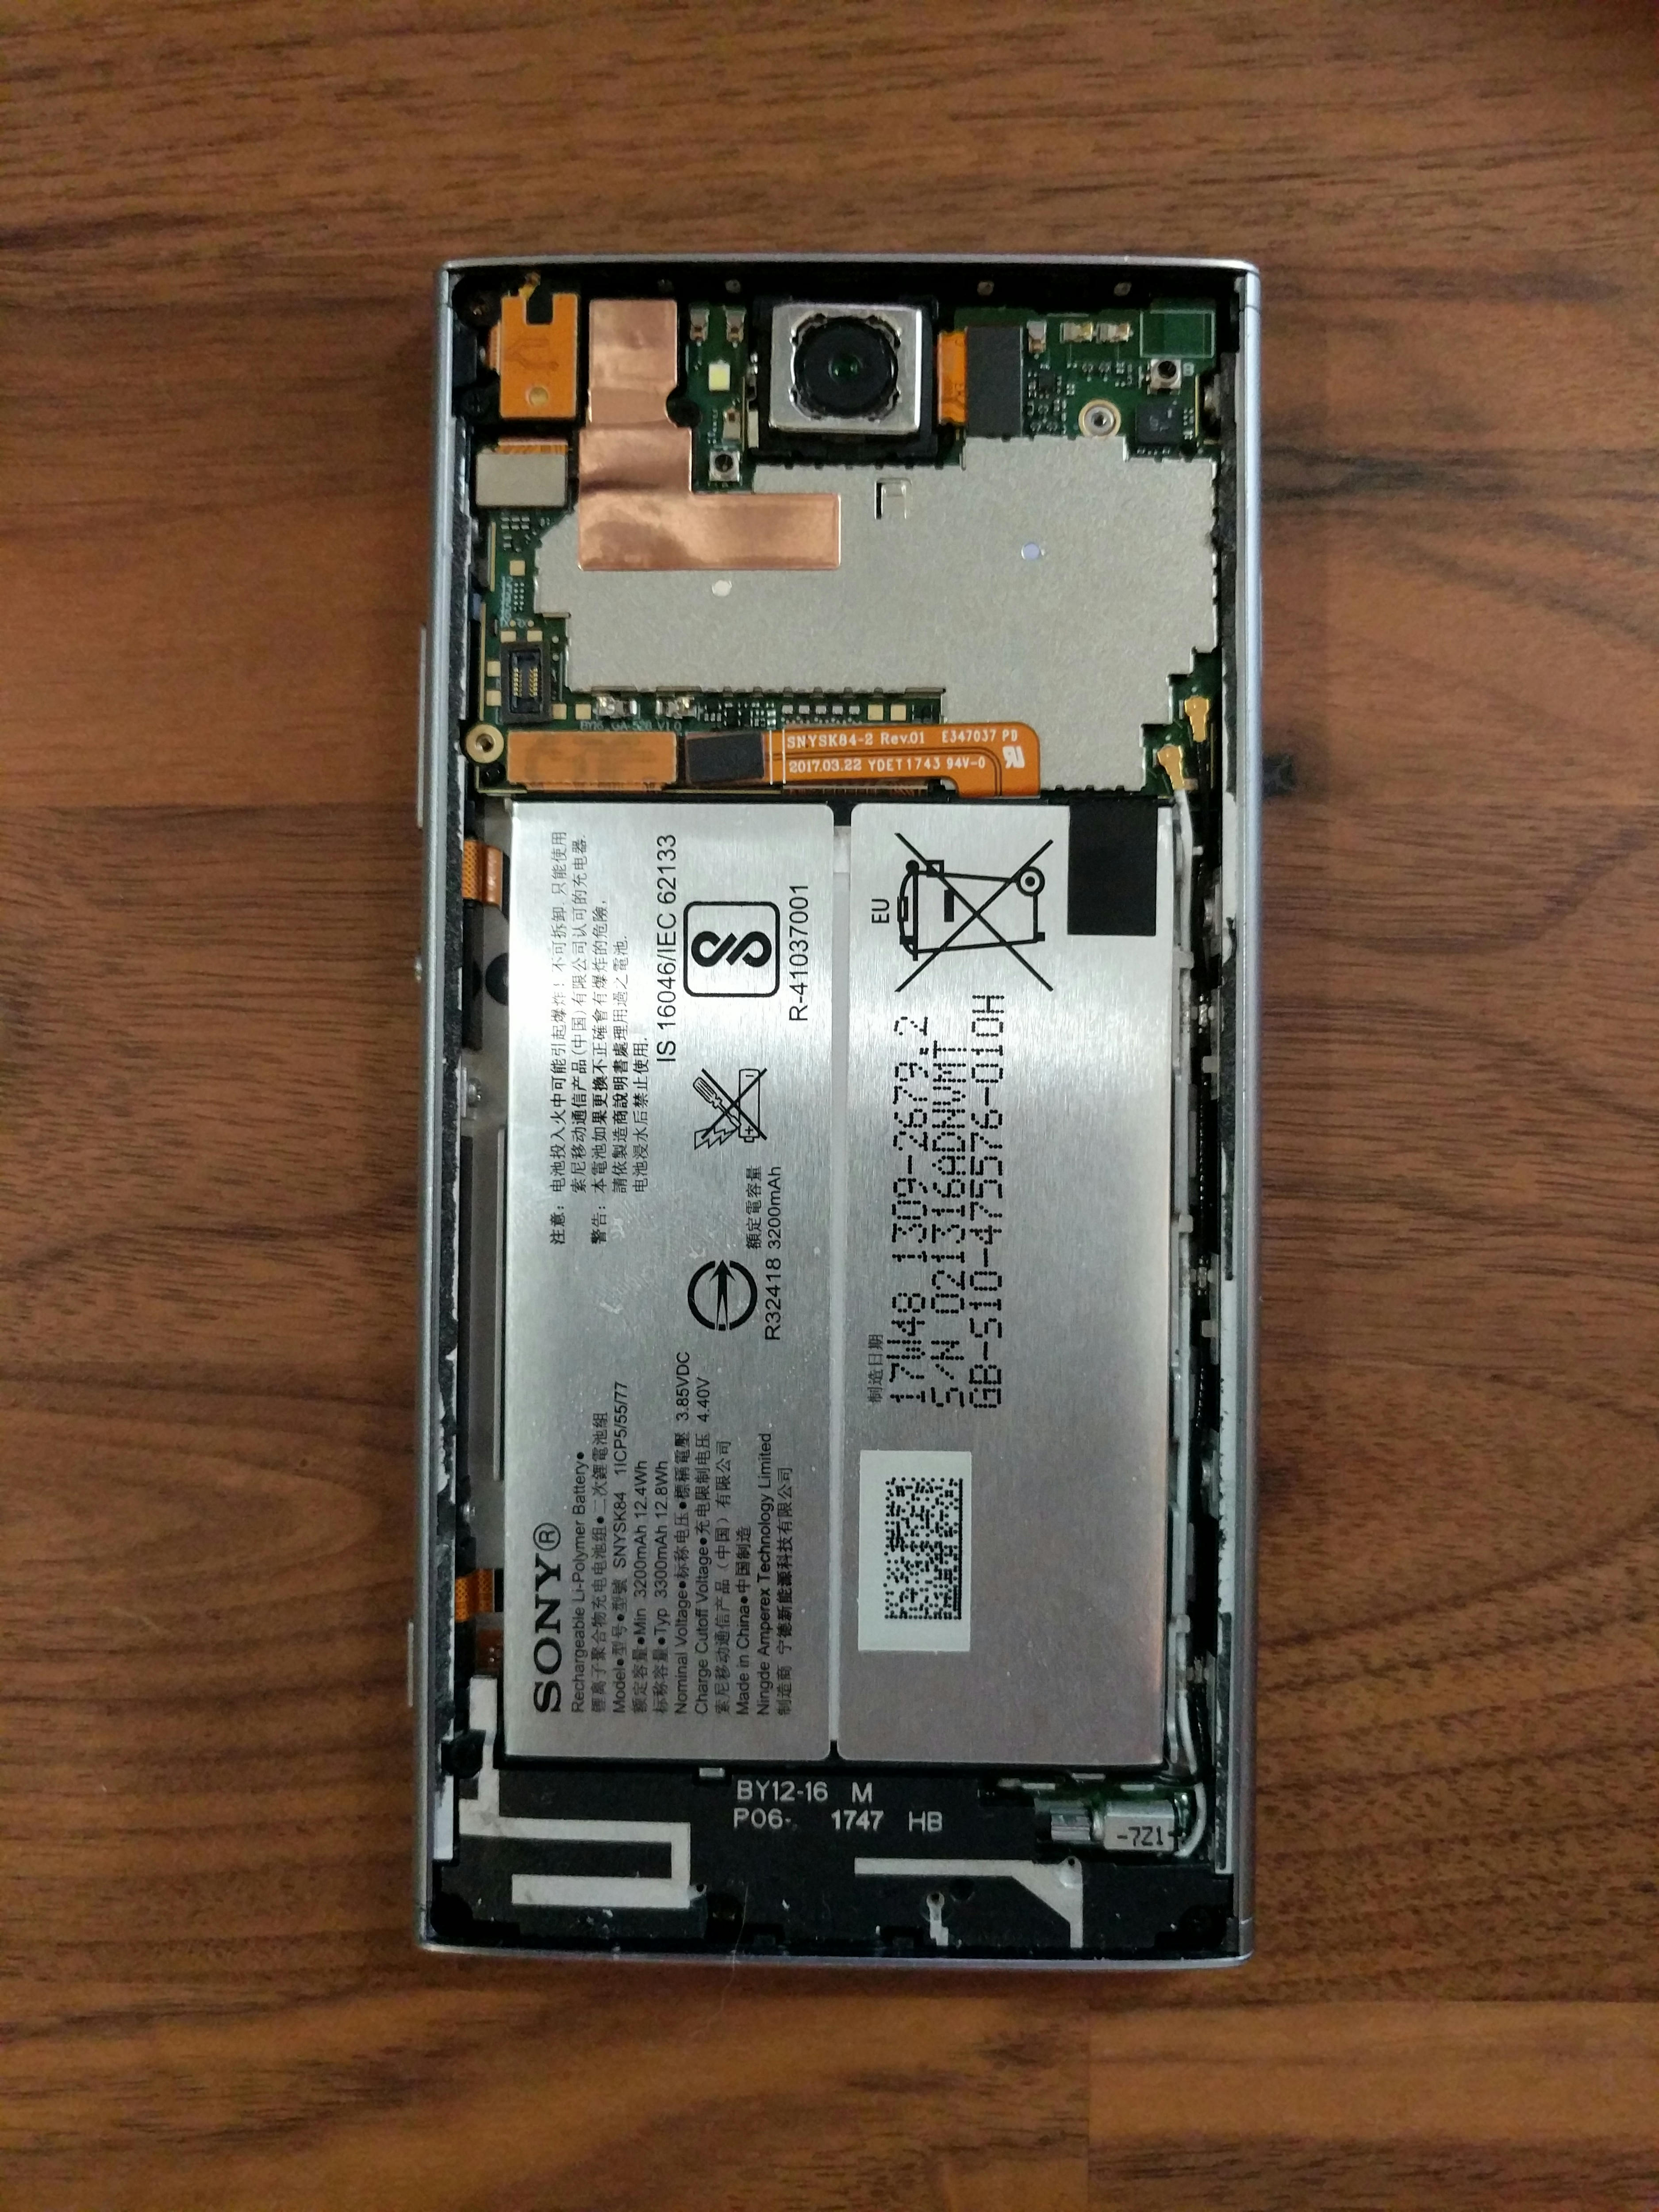
Do you see the UART pins? Me neither. They're right here, labelled TX and RX, on the left side: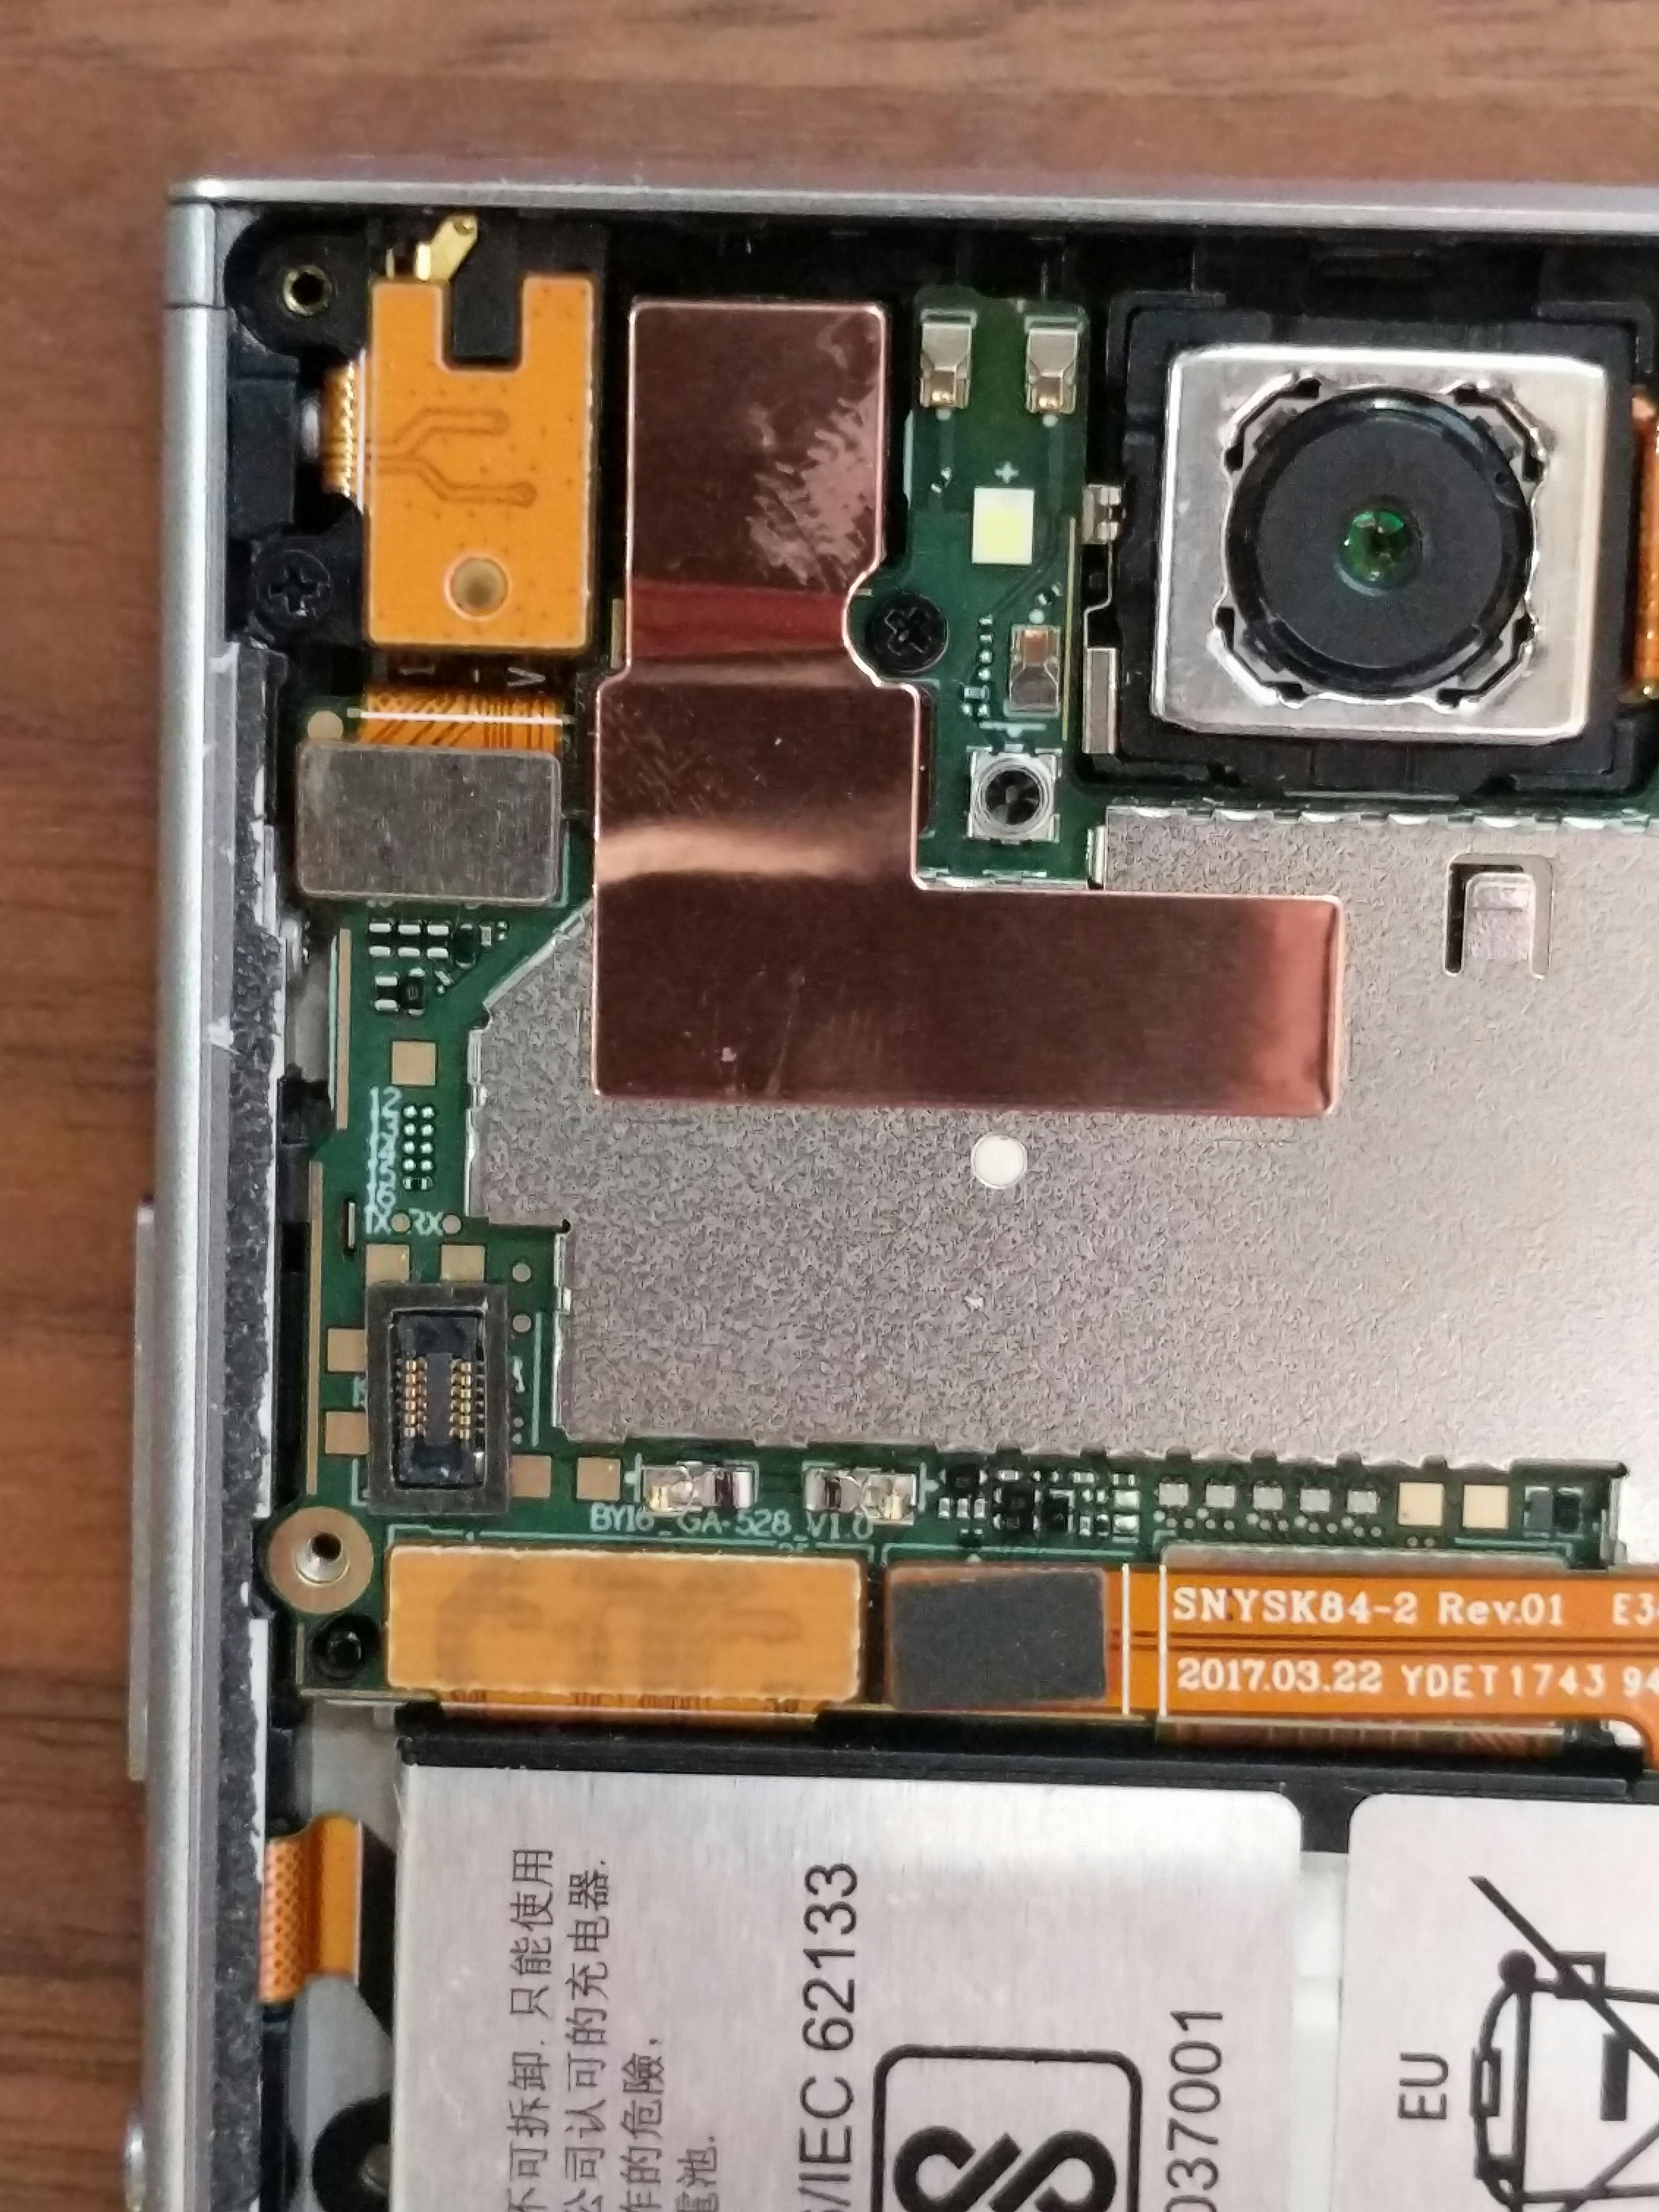
Luckily they're not as small as the 8 JTAG pins are right above them.
Soldering
The first attempt at soldering some cut up breadboard jumper wires failed as it was hard to get the wires to actually stick to the pads. After buying some 26-AWG solid core wire (and using some hot glue) the second attempt went much better: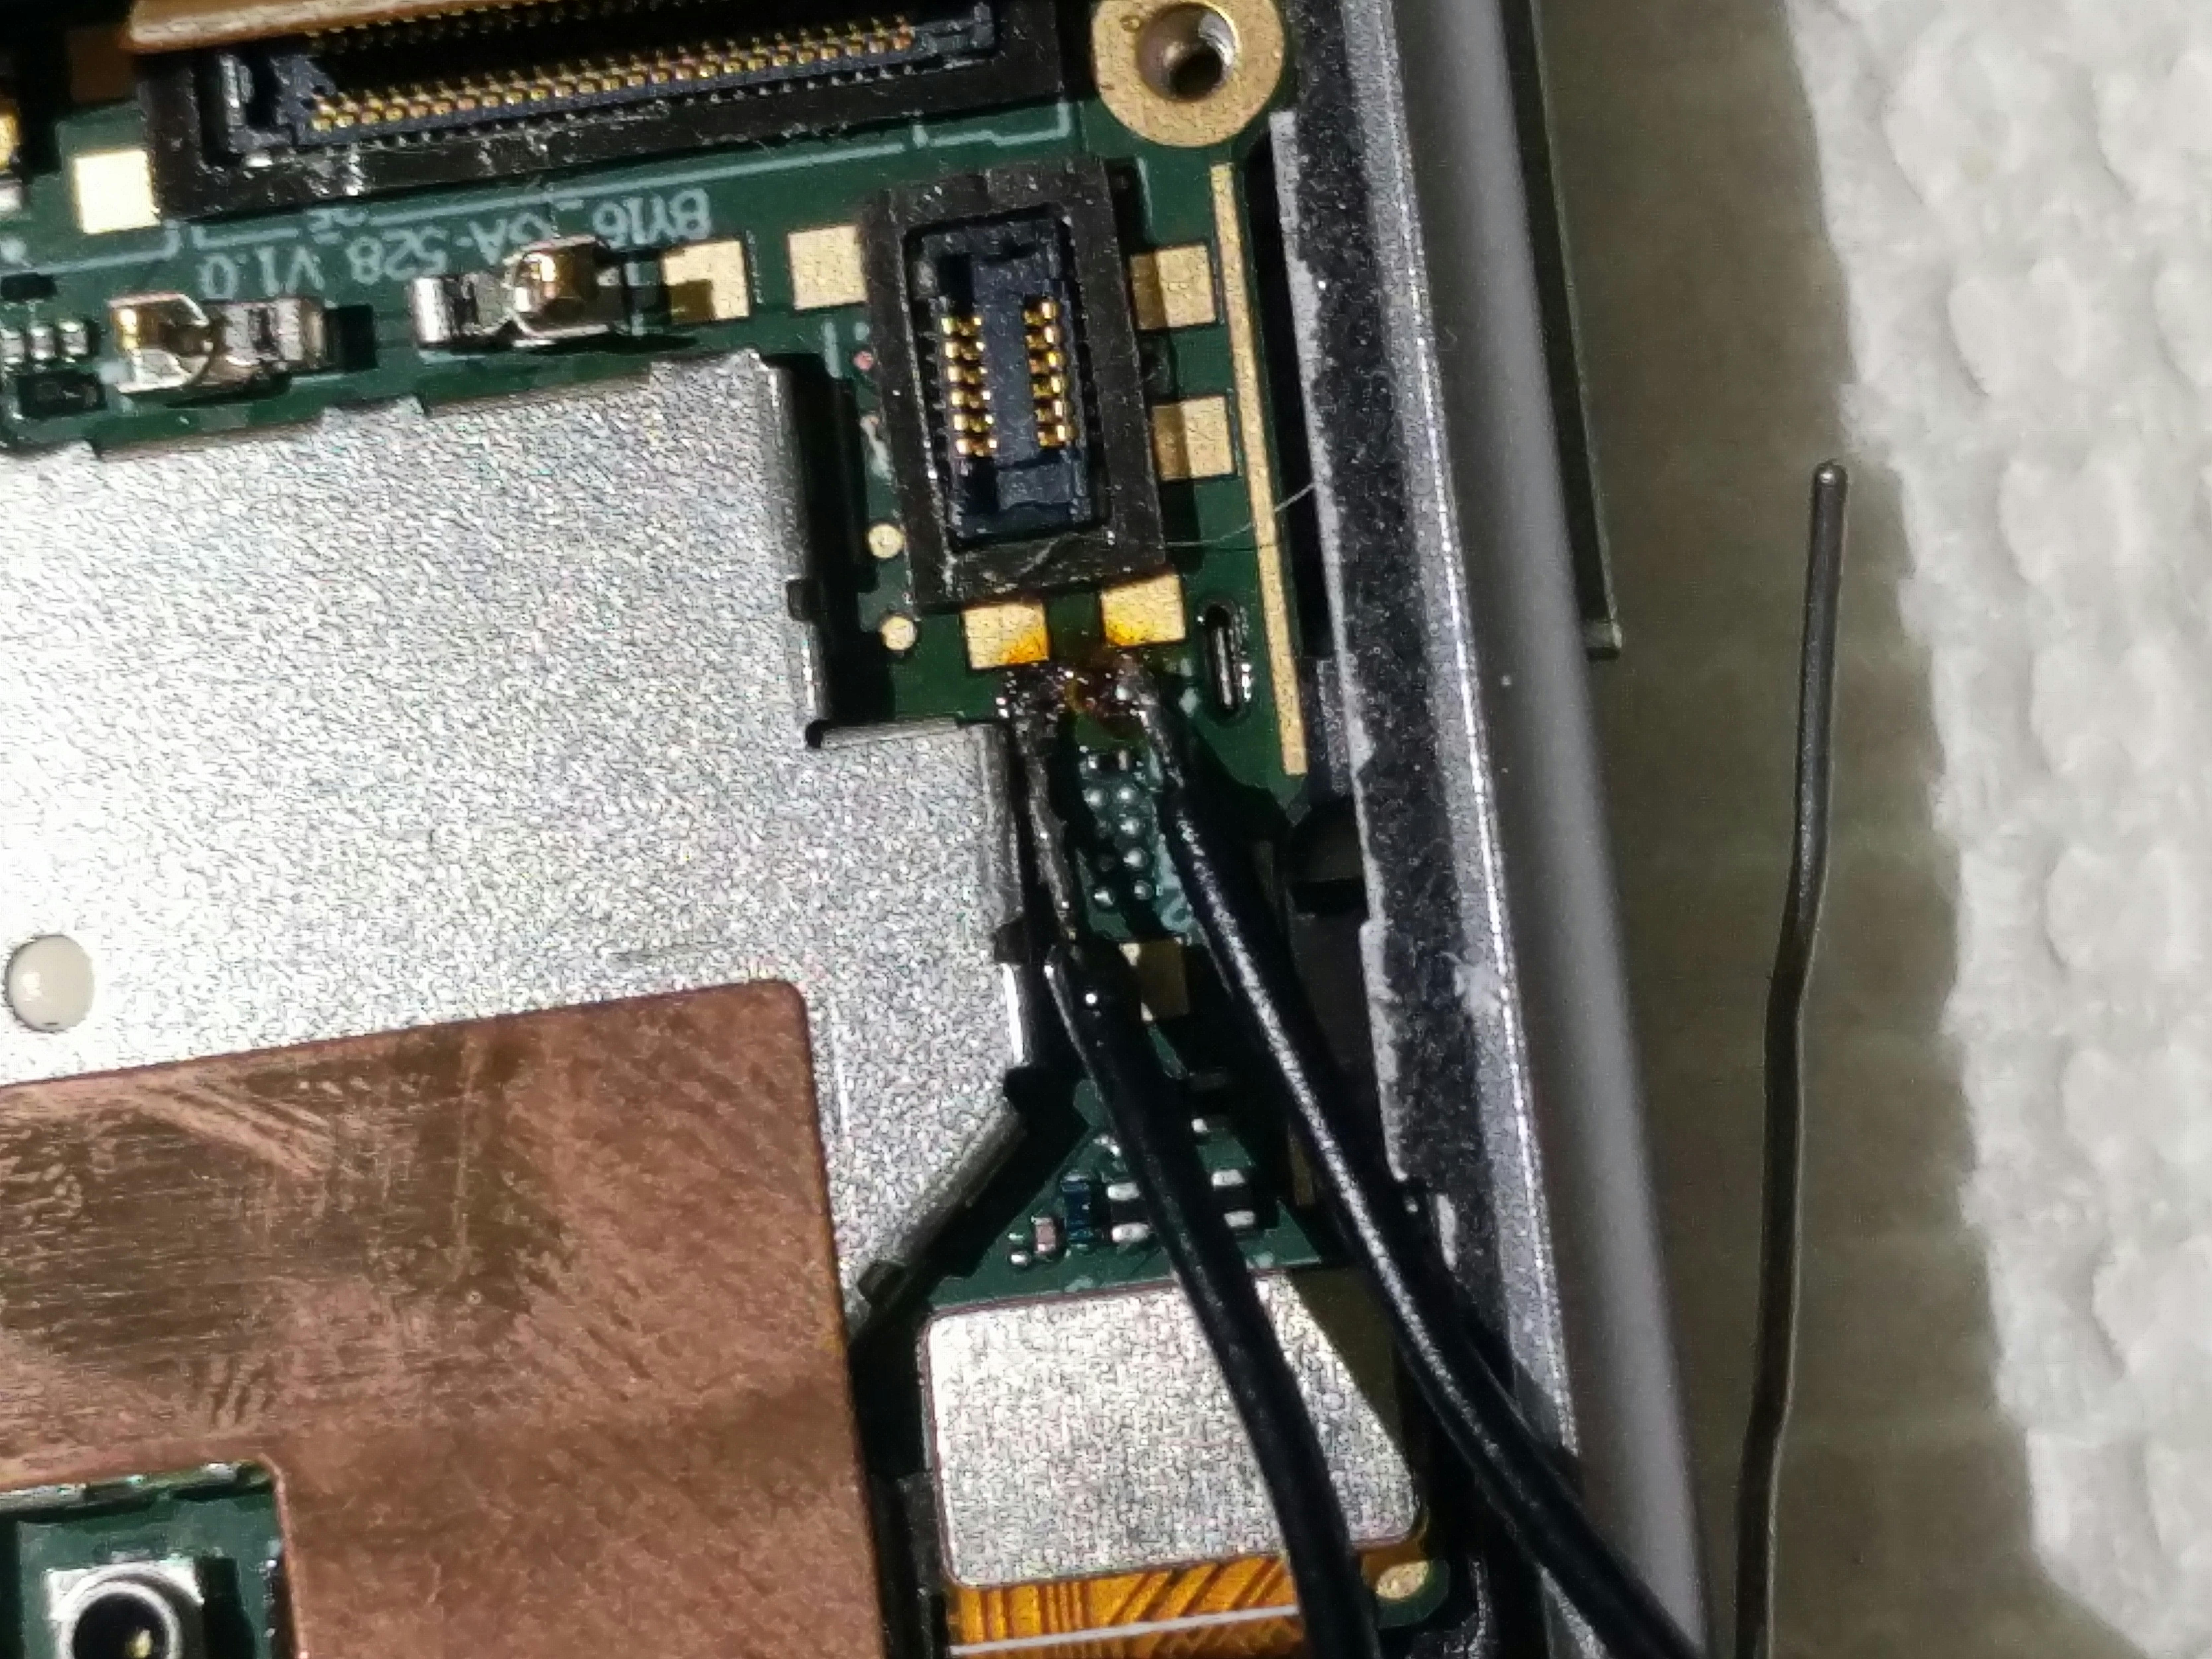
Reading the data
Now, all we have to do is make use of the electricity flowing down these wires. Sony recommends soldering a connector to the board and using a USB-to-UART adapter, but I didn't have one and didn't want to wait for one to arrive. But I do have an ESP32 with some GPIO pins. Can I use those and (one of the 3) onboard UART controllers to read the information? Turns out, yes! ESP-IDF's UART API is simple to use, and we only need a few lines of code.
#include <stdio.h>
#include <inttypes.h>
#include "sdkconfig.h"
#include "freertos/FreeRTOS.h"
#include "freertos/task.h"
#include "esp_chip_info.h"
#include "esp_flash.h"
#include "esp_system.h"
#include "driver/uart.h"

#define TX_PIN 4
#define RX_PIN 5
#define BUF_SIZE 4096

const uart_port_t uart_num = UART_NUM_1;
static QueueHandle_t uart1_queue;

static void uart_read_task(void *arg) {
    uint8_t *data = (uint8_t *) malloc(BUF_SIZE);
    while (1) {
      int length = 0;
      ESP_ERROR_CHECK(uart_get_buffered_data_len(uart_num, (size_t*)&length));
      length = uart_read_bytes(uart_num, data, length, 0);
      if (length != 0) {
        data[length] = '\0';
        printf("%s", (char*)data);
      }
      vTaskDelay(10 / portTICK_PERIOD_MS);
    }
}

void app_main(void)
{
    uart_config_t uart_config = {
        .baud_rate = 115200,
        .data_bits = UART_DATA_8_BITS,
        .parity = UART_PARITY_DISABLE,
        .stop_bits = UART_STOP_BITS_1,
        .flow_ctrl = UART_HW_FLOWCTRL_DISABLE,
    };
    ESP_ERROR_CHECK(uart_param_config(uart_num, &uart_config));

    // Set UART pins(TX: IO4, RX: IO5, RTS: disabled, CTS: disabled)
    ESP_ERROR_CHECK(uart_set_pin(uart_num, TX_PIN, RX_PIN, UART_PIN_NO_CHANGE, UART_PIN_NO_CHANGE));

    ESP_ERROR_CHECK(uart_driver_install(uart_num, BUF_SIZE, BUF_SIZE, 10, &uart1_queue, 0));

    xTaskCreate(uart_read_task, "uart_read_task", 2048, NULL, 10, NULL);
}
This code sets up the UART controller with the correct baud rate and transmission settings, specifies which GPIO pins to use, and starts reading into a buffer in a loop. Here's the simple hardware setup - just an ESP32, a breadboard, and two wires.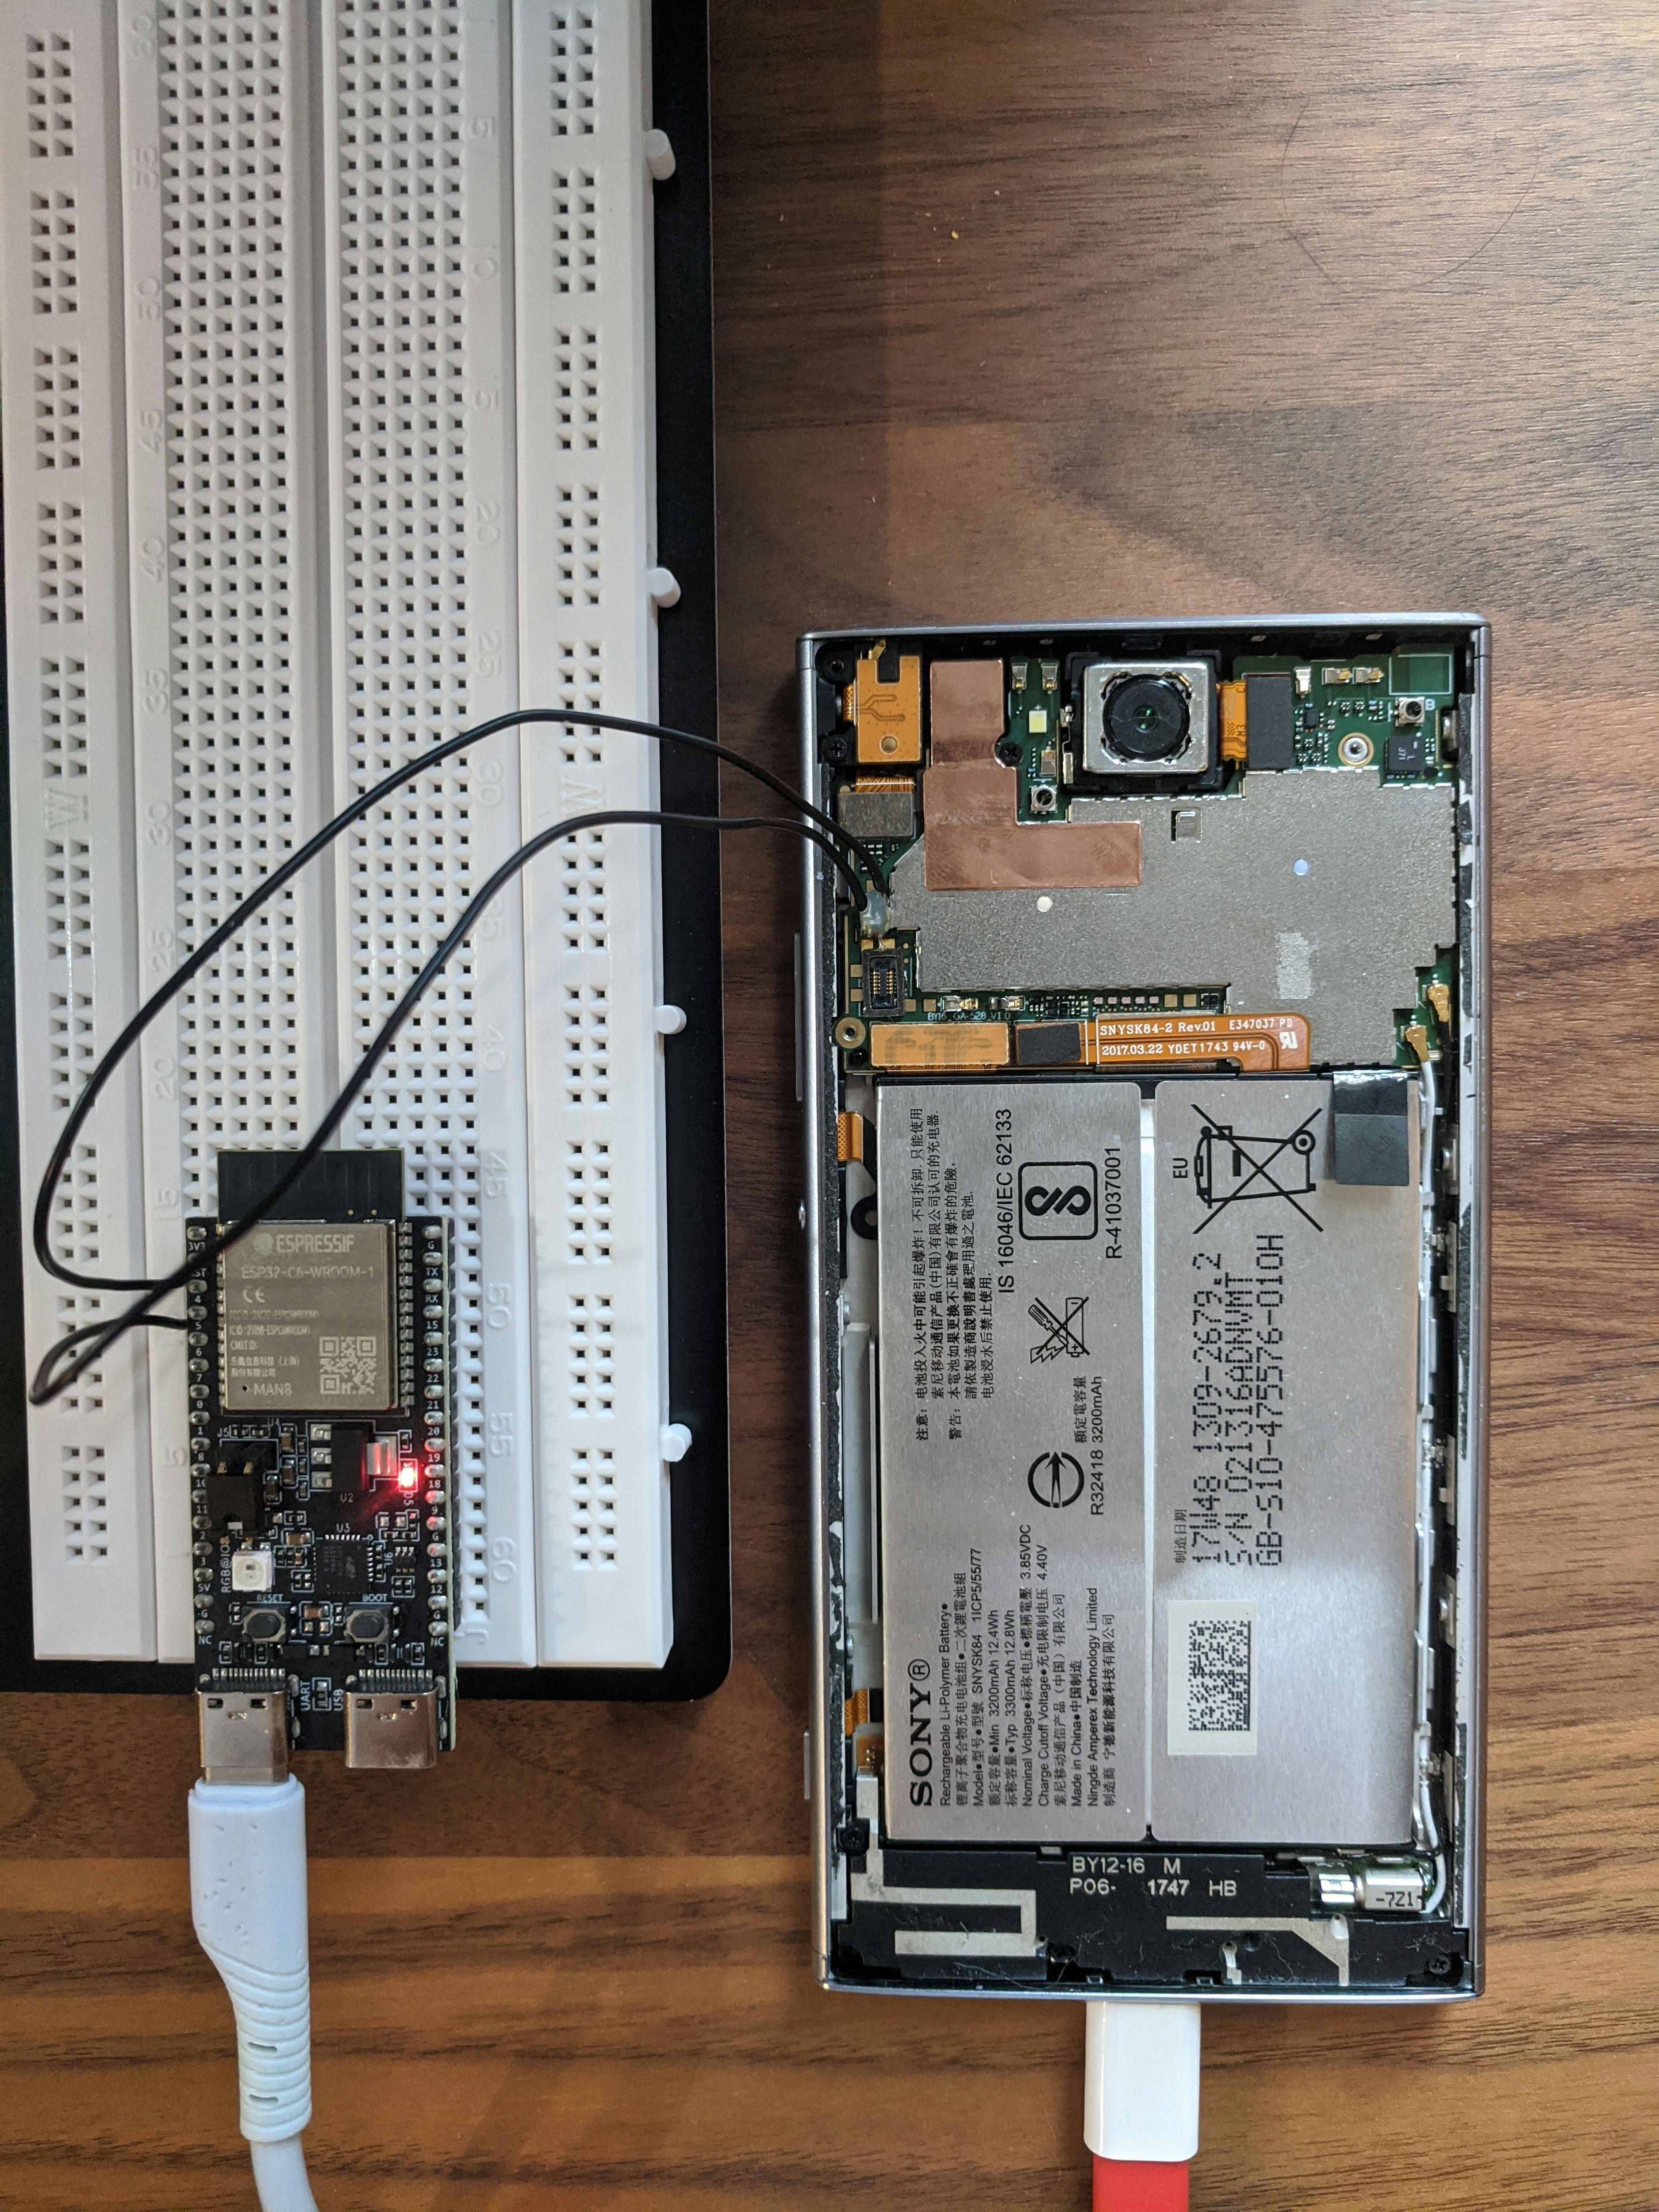
Logs
After flashing the code and rebooting the device, we do see some output. It works! Sort of.
...
RAM Partitions
Ad$0000080000000 Available Length: ��0x0000000060000000
WARNING: Could not find me-o�fline no@e.
kaslr-Seed is added to ch/�en node
MD�,a�for-L)b: tricger Panel_CDP_BacklightPower
MDPPlatfrmL@b:b: trigger �abl%Wled ~~~
MDPPl!tfgrmLib: P!ne,_CD^Po7erUp Powerl0Ckms_drpl1ckms_pmpl1ckms[dsrtckms_pmrtckms_dsfycckms_icsm
...
There's some missing lines and some corrupted characters too. After some messing around with the buffer size & read delay (which initially improved the output somewhat), I connected the RX pin (since the code only reads data I didn't have it connected). For some reason that did it, and we now get super clean UART output
We see logging from the PBL (Qualcomm's primary bootloader):
B -         0 - PBL, Start
B -      7114 - bootable_media_detect_entry, Start
B -     44355 - bootable_media_detect_success, Start
B -     44360 - elf_loader_entry, Start
B -     46116 - auth_hash_seg_entry, Start
B -     74215 - auth_hash_seg_exit, Start
B -    127851 - elf_segs_hash_verify_entry, Start
B -    177965 - elf_segs_hash_verify_exit, Start
B -    177979 - auth_xbl_sec_hash_seg_entry, Start
B -    207060 - auth_xbl_sec_hash_seg_exit, Start
B -    207061 - xbl_sec_segs_hash_verify_entry, Start
B -    213821 - xbl_sec_segs_hash_verify_exit, Start
B -    213870 - PBL, End
The SBL (Qualcomm's Secondary Bootloader):
B -    240340 - SBL1, Start
B -    354044 - usb: hs_phy_nondrive_start
B -    354410 - usb: hs_phy_nondrive_finish
B -    357673 - boot_flash_init, Start
D -        30 - boot_flash_init, Delta
B -    365024 - sbl1_ddr_set_default_params, Start
D -       122 - sbl1_ddr_set_default_params, Delta
B -    373015 - boot_config_data_table_init, Start
B -    396378 - Using default CDT
D -     18879 - boot_config_data_table_init, Delta - (54 Bytes)
B -    398299 - CDT Version:3,Platform ID:8,Major ID:1,Minor ID:0,Subtype:0
B -    404125 - PMIC Image Load, Start
D -     16623 - Auth Metadata
D -       457 - Segments hash check
D -     26901 - PMIC Image Loaded, Delta - (34336 Bytes)
B -    434350 - pm_device_init, Start
B -    441518 - PM: PON REASON: PM0=0x8000028000000011:0x0 PM1=0x8000088000000020:0x0
B -    483547 - PM: SET_VAL:Skip
D -     45780 - pm_device_init, Delta
B -    485468 - pm_driver_init, Start
B -    492361 - no SDI. gcc_reset_status=2
B -    492971 - S3_timer is set to 16sec
B -    512491 - PM: OCP Clearing for L4A is Skipped :PM660 is not supported the LDO4
D -     24064 - pm_driver_init, Delta
B -    518927 - pm_sbl_chg_init, Start
B -    556686 - PM: Trigger FG IMA Reset
B -    556899 - PM: Trigger FG IMA Reset.Completed
B -    560559 - PM: EntryVbat: 4242; EntrySOC: -1
B -    563762 - PM: BATT TEMP: 29 DegC
B -    568245 - PM: Vbatt: 4242; Ibatt: -1
B -    571539 - PM: Charger SRC: OTHER; Type: 8
B -   1075094 - PM: SBL Charging in progress....
B -   1583133 - PM: BATT TEMP: 29 DegC
B -   1583255 - PM: ExitVbatt: 4242
D -   1063169 - pm_sbl_chg_init, Delta
B -   1588867 - vsense_init, Start
D -         0 - vsense_init, Delta
B -   1647061 - Pre_DDR_clock_init, Start
D -       366 - Pre_DDR_clock_init, Delta
D -         0 - sbl1_ddr_set_params, Delta
B -   1658773 - DSF version = 36.0, DSF RPM version = 22.0
B -   1658773 - Max Frequency = 1296 MHz
B -   1662890 - do_ddr_training, Start
B -   1673718 - Bootup frequency set to 1296000
D -      7228 - do_ddr_training, Delta
�B -   1693512 - LOG_BUF IMEM->DDR migrated 3354 bytes of 3584 bytes
B -   1693634 - DDR_INFO:LogVer=0002,type=0007,MR4=0x0001,0x0001,0x0002,0x0002,MR5=0xff,MR6=0x02,MR7=0x10,MR8=0x0c
B -   1698575 - DDR_RANK:LogVer=0002
B -   1708396 -   ** sdram0_cs0=768MB,sdram0_cs1=768MB
B -   1711843 -   ** sdram1_cs0=768MB,sdram1_cs1=768MB
B -   1716540 - clock_init, Start
D -       274 - clock_init, Delta
B -   1727184 - APDP Image Load, Start
D -       396 - APDP Image Loaded, Delta - (0 Bytes)
B -   1730966 - usb: EMMC Serial - 2ac300
B -   1912258 - usb: chgr -  SDP_CHARGAR
B -   1912594 - boot_restore_debug_regions - Start
B -   1917565 - boot_restore_debug_regions - End
B -   1921927 - PM: 0: PON=0x11:USB_CHG:HARD_RESET: ON=0x80:PON_SEQ: POFF=0x2:PS_HOLD: OFF=0x80:POFF_SEQ
B -   1923787 - PM: 1: PON=0x20:PON1: ON=0x80:PON_SEQ: POFF=0x8:GP1: OFF=0x80:POFF_SEQ
B -   1932937 - PM: SMEM Chgr Info Write Success
B -   1940471 - sbl1_efs_handle_cookies, Start
D -       549 - sbl1_efs_handle_cookies, Delta
B -   1948950 - QSEE Dev Config Image Load, Start
D -     18574 - Auth Metadata
D -      1037 - Segments hash check
D -     26535 - QSEE Dev Config Image Loaded, Delta - (42092 Bytes)
B -   1978108 - Image Load, Start
D -       396 - SEC Image Loaded, Delta - (4096 Bytes)
B -   1986953 - QSEE Image Load, Start
D -     52796 - Auth Metadata
D -     18269 - Segments hash check
D -    100497 - QSEE Image Loaded, Delta - (1946648 Bytes)
B -   2089311 - QHEE Image Load, Start
D -     18574 - Auth Metadata
D -      3020 - Segments hash check
D -     31201 - QHEE Image Loaded, Delta - (273136 Bytes)
B -   2122556 - RPM Image Load, Start
D -     18635 - Auth Metadata
D -      2196 - Segments hash check
D -     32269 - RPM Image Loaded, Delta - (219308 Bytes)
B -   2157417 - STI Image Load, Start
D -      4514 - STI Image Loaded, Delta - (0 Bytes)
B -   2165561 - ABL Image Load, Start
D -     18575 - Auth Metadata
D -      4484 - Segments hash check
D -     32879 - ABL Image Loaded, Delta - (531024 Bytes)
B -   2200636 - APPSBL Image Load, Start
D -     19154 - Auth Metadata
D -     15890 - Segments hash check
D -     53527 - APPSBL Image Loaded, Delta - (2048000 Bytes)
B -   2256542 - SBL1, End
And of course Linux kernel logs:
[    0.000000] Booting Linux on physical CPU 0x100
[    0.000000] Initializing cgroup subsys cpuset
[    0.000000] Initializing cgroup subsys cpu
[    0.000000] Initializing cgroup subsys cpuacct
[    0.000000] Initializing cgroup subsys schedtune
[    0.000000] Linux version 4.4.78-perf+ (BuildUser@BuildHost) (gcc version 4.9.x 20150123 (prerelease) (GCC) ) #1 SMP PREEMPT Mon Jun 11 16:38:26 CST 2018
[    0.000000] Boot CPU: AArch64 Processor [51af8014]
[    0.000000] Machine: Qualcomm Technologies, Inc. SDM 630 PM660 + PM660L Int. Audio Codec MTP
[    0.000000] core_ctl: disable_cpumask=0-7
[    0.000000] earlycon: Early serial console at MMIO 0xc170000 (options '')
[    0.000000] bootconsole [uart0] enabled
[    0.000000] board-ramdump: boot mode detected as normal
[    0.000000] system booted with SECURITY_STATUS : ON
and much more!
Did you know Qualcomm's bootloader uses UEFI?
UEFI Start     [ 2432] SEC
PROD Mode   : Off
DEBUG Mode : On
ASLR        : On
Timer Delta : +7 mS
RAM Entry 0 : Base 0x00000000E0000000  Size 0x000000005EAC0000
��RAM Entry 1 : Base 0x0000000080000000  Size 0x0000000060000000
CONF File   : uefiplatLA.cfg
UEFI Ver    : 4.2.190620.BOOT.XF.1.4-00265-S660LZB-1
Build Info  : 64b Jun 20 2019 17:21:00
Boot Device : eMMC
and the device is apparently not in PROD mode, but in DEBUG mode, whatever that means.
Or that I've restarted the phone 278 times? Boot counter is 278.
Or that phones do memory training just like desktops?
B -   1662890 - do_ddr_training, Start
B -   1673718 - Bootup frequency set to 1296000
D -      7228 - do_ddr_training, Delta
The full logs can be found here.
Conclusion
With some soldering and a small amount of code, I was able to capture logs from every different level of Android's boot process (more of which can be read about here), including the PBL which is stored on the SoC itself. This can be an invaluable step when debugging issues in the early stages of device bringup. If you've explored a similar thing, I'd love to hear about your successes (or headaches) with UART or Android bringup.